Lap Desk
The project objective was to design and create a functional piece of furniture that would be durable enough to withstand normal wear and tear. As a requirement, we had to incorporate organic and synthetic materials in a harmonious manner. In this case, wood and a 3D printed element. In terms of wood use, we were limited to a 4' x 4' sheet of 1/2'' thick finished plywood and three 1'' x 4'' x 96'' boards of select pine. The only limitation on the 3D printed component was time. You could include as much as you wanted as long as it was completed and adhered to the final product at the end of the three-week deadline. Taking into consideration the amount of wood we were allocated, I opted for a smaller and more practical piece of furniture; a lap desk.


Design
Organic
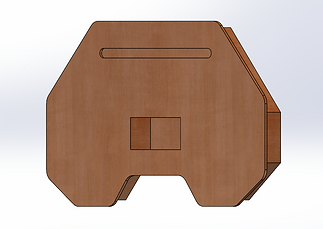
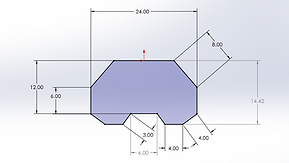
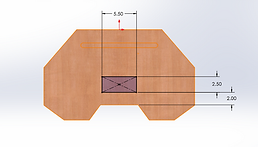
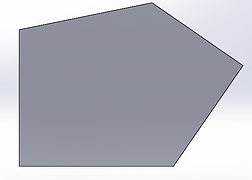
During the design process, we first had to decide what to create. Then we could draw our ideas for easier visualization. These preliminary sketches were necessary to avoid square or rectangular surfaces, excessive amounts of 90-degree angles, and visible hardware. From these illustrations, we chose the concept which would work best both creatively and practically. For the organic portion of the lap desk, I decided upon a form that somewhat mimics the shape of the remotes used in gaming consoles. I chose this shape because it maximizes the amount of usable space available. Instead of being able to fit only a computer or a notebook on its surface, both can be present simultaneously. The desk can hold up to a 15.5'' laptop on either slant and standard-sized notebook on the opposite side. In addition to this, it has a 2.5'' x 5.5'' x 4'' storage compartment, a 0.75'' x 11.5'' pencil slot, and carrying handle. Further, all the corners of the lap desk have been given a 1-inch rounded edge for added safety. I chose this design because I realized most of the lap desks currently on the market are rectangular and do not offer a place for storage or a cutout around the stomach area. Having these components present in my product contributes to its usability, uniqueness, portability, and how comfortable it is for the consumer.


Synthetic
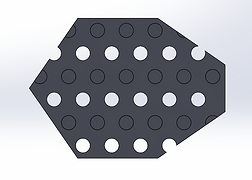
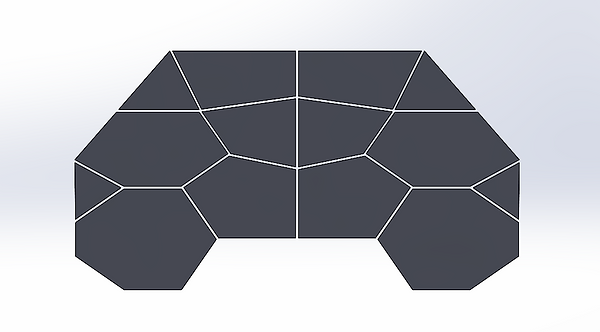
For the synthetic portion of the project, I took inspiration from rubber cupboard liners. The purpose of cupboard liners, as many already know, is to prevent items stored on your shelves from sliding around. Keeping this in mind, I wanted to add a textured pattern to the bottom of my lap desk; to keep it from slipping when placed on your legs. The design I came up with fills the entire bottom half of the desk. There are a total of seven unique pieces which have been mirrored over the vertical center line to create the image pictured below. Six shapes have a diamond pattern made from circles on their faces, while the remaining eight are blank; an example is to the right.
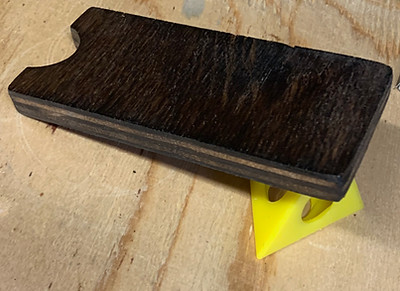
Final Product
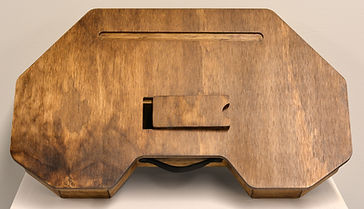
Overall, the lap desk has turned out exactly as I planned for it to be. Many months have passed, and the desk has withstood everything from laptops and hot food to people standing on it or being dropped. Throughout this, no damage has occurred. Further, the lid fits perfectly inside the hole and does not fall out when tipped upside down. The handle aids in its portability, and I find the cutout for the stomach area much more comfortable than other lap desks I have tried. Lastly, I am satisfied with my decision to incorporate the synthetic design onto the bottom of the lap desk. The pieces add just enough friction between the fabric of your clothes, without ripping them, to keep the desk stable while still moving effortlessly on smooth surfaces.


Take Aways
The most helpful thing I learned through designing and building the lap desk was how to use the CNC router. Without this machine, my project would have taken much longer to complete and would probably not have come out as precise.
Build
The first step in the construction process was to cut the plywood into a 19'' x 27 '' sheet using the panel saw so that it would be able to fit on the CNC router. After the wood was cut to size, I secured it to the CNC platform with screws. Next, using the data from my SolidWorks file, the router cut out the hole for the storage compartment, the pencil slot, and the general shape of the top of the desk. Once the front was complete, I flipped it over, securing it in the same fashion, and had the CNC router create 0.76'' wide slots along the perimeter. That way, the side panels could be inset into the top by approximately 0.5''. Using the remanence of the plywood, I cut out the bottom part of the lap desk with the CNC router. Next, the pine boards had to be cut to the correct angle. Unfortunately, all the angles were different, and the process became more difficult. Luckily I had the slots made on the top, because from that, I could mark out approximate angles to get the right fit. After the pine boards were cut, I assembled the desk using wood glue and a finish nailer. The last steps in the construction phase are as follows: cut a lid with the bandsaw, sand, stain, and coat the wood with polyurethane, glue down the 3D printed pattern pieces, and add a handle.